Monday, March 22, 2010


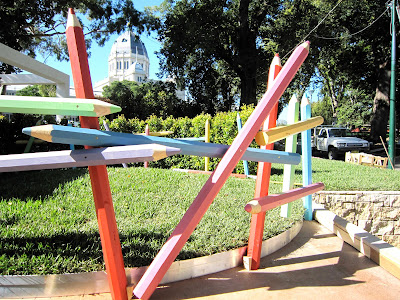
I went down to the Melbourne International Flower & Garden Show yesterday for Better Homes & Gardens TV and this was one of the projects I worked on. Jason Hodges is entering into the competition again and this year his garden design included a fun area for the kids, complete with a coloured pencil fence. The pencils were shaped out of treated pine and ready for me to paint in bright, happy colours. They were really easy to do and so effective - I wouldn't mind a few in my own back yard! Good luck Jason! Don't miss the show on Friday 7:30pm on Seven.

Saturday, March 20, 2010

Shadow Box Art


I created this knife picture years ago and it's been part of our kitchen ever since. People often think there must be sentiment attached but really it's just a nice way of showing off some cute knives I found at a market. The box frame came from Corban & Blair. They're available in a few colours and are deep enough to house all kinds of treasures. I covered the backing board with thick white card, then attached a sheet of foam core and textured watercolour paper cut just a little smaller - this gives a nice raised effect to the composition. I prefer a hot glue gun to attach the knife handles but you could use super glue or a quality craft glue instead. And I suppose it goes without saying... but I will anyway, please, please don't do this to your Grandmother's heirloom knives as they glue is not awfully kind to the handles. Save the good ones for best and scour junk shops or flea markets for your art instead.


Tuesday, March 9, 2010

Cool Coasters


These are coasters I've been making for some of my workshops lately and they really are proving popular. People get really excited when they see that the designs are actually paper napkins ( don't we all love those) and I have simply glued them on.

The idea is really simple, just grab a few unglazed stone tiles and brush them well with Mod Podge. Take a paper napkin and cut it into four. Peel off the two backing layers of the napkin and apply the design to the surface of the tile. Leave them overnight to dry then sand the edges with a foam sanding pad before varnishing. Oh and I also stick on some clear bumps underneath to protect my tables.

Sunday, March 7, 2010

Saturday, March 6, 2010


Ok, so I finished the paintings and am happy with how they turned out. All up they took me maybe two hours to complete and frame.

I used Arches paper - rough texture - 300gsm and Maimeri Water Colours in Sepia and Neutral Tint. For the fish I added a little Cyan and Primary Yellow. Oh and the frames are from Ikea. Keep an eye out for them on Better Homes and Gardens TV soon. xx


Water Colours

Today I've been working on some easy water colours for a kitchen makeover I'm doing next week on the show. The theme for the kitchen is fresh and light with plenty of glass, oak timber benches and white cabinets, a real contrast to the dark, dreary room that was there before.

I love doing quick paintings to add to my rooms, they really do add that 'hand touched' feel and are of course easy on the budget. I'll be sure to show you how they turn out.